
The Ultimate Guide to Mini Excavator Attachments and Accessories (For Machines 2 Tons and Below)
Let’s be entirely honest: buying a mini excavator is only half the investment. If you are running a mini excavator specifically in the highly versatile “2 tons and below” weight class, like a Terror XIX or a Terror XI Storm, the machine itself is essentially just a mobile hydraulic power unit. The real magic, the stuff that actually makes you money and saves your back, happens at the end of the stick.
Whether you are a solo landscaping contractor squeezing through 36-inch backyard gates, a plumber digging precise utility trenches, or a weekend warrior tackling property management, slapping the right piece of steel onto your machine changes everything.
This comprehensive guide delves into the world of mini excavator attachments specifically designed for sub-2-ton machines. We will cover the exact tools you need, how to swap them without losing your mind (or a finger), and how to ensure perfect compatibility, drawing heavily on specialized catalogs like Typhon Machinery’s Sub-2-Ton Attachments.
1. The Heavy Hitters: Different Types of Attachments Available for Subcompact Machines
When you are operating equipment under 2 tons, you are working with a very specific footprint and hydraulic flow. You can’t just throw a massive forestry mulcher on a 1-ton machine and expect it to spin. Here is the breakdown of the exact attachments built for this weight class.
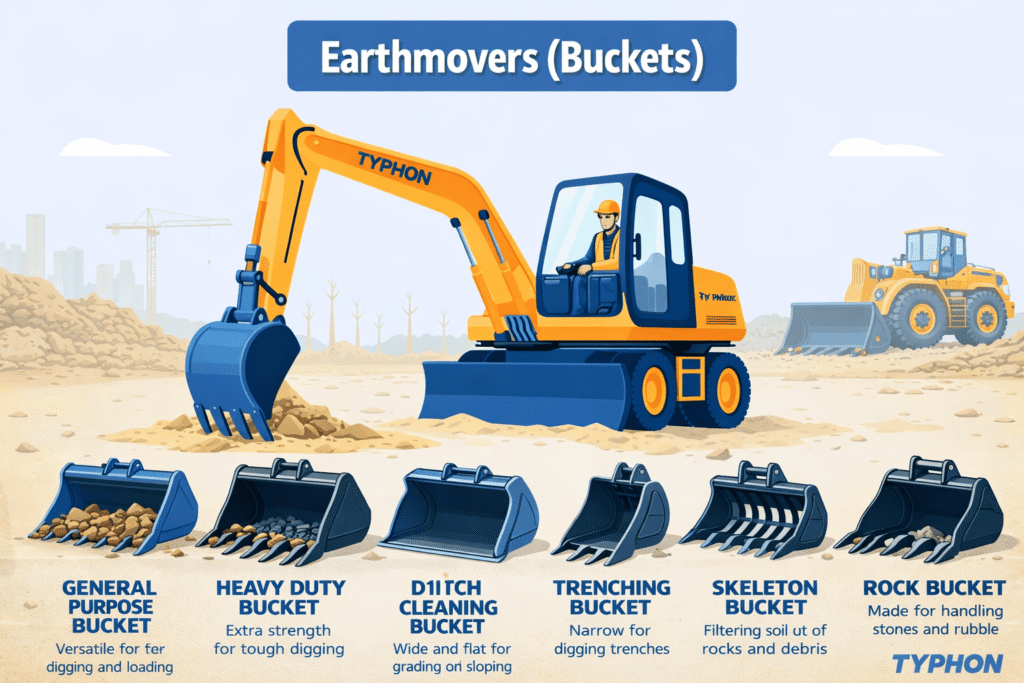
The Earthmovers (Buckets)
- The Standard Trenching Bucket (8″ to 16″): This is your daily driver. On a mini excavator, an 8-inch or 12-inch bucket with replaceable teeth is perfect for running irrigation lines, conduit, or small drainage pipes without disturbing the surrounding lawn.
- The Grading/Clean-up Bucket (24″ to 36″): This model is a wider, toothless bucket. If you need to backfill a trench, smooth out topsoil for sod, or clean out a muddy ditch, this is the tool. Using a toothed bucket for grading is like trying to ice a cake with a fork use the right tool.
- The V-Bucket: A specialty bucket that digs a trench with sloped sides. It’s incredibly useful for laying pipe in loose soil where straight trench walls might collapse.
The Demolition and Extraction Tools
- The Ripper Shank: If you’ve ever tried to dig through hardpan clay, frozen ground, or dense tree roots with a standard bucket, you know it just bounces off. A ripper focuses 100% of your machine’s breakout force onto a single, heavy-duty steel point. You rip the ground first, then scoop it out.
- Root Rakes: Imagine a heavy-duty comb for the dirt. Rakes allow you to pull rocks, roots, and debris out of the soil while letting the beneficial dirt sift through the tines. It’s essential for site cleanup.
- Micro Hydraulic Breakers: Yes, you can put a hammer on a 1.5-ton machine! These scaled-down hydraulic breakers are perfect for busting up old residential sidewalks or driveway aprons without bringing in a massive, heavy-duty rig that would crack the client’s driveway.
The Material Handlers
- Thumbs (Mechanical and Hydraulic): A sub-2-ton machine without a thumb severely limits its potential. A thumb presses against the bucket, acting like a giant hand. It allows you to pick up irregular objects like boulders, broken concrete chunks, or logs.
- Log/Brush Grapples: For dedicated brush clearing, a grapple replaces the bucket entirely, offering two clamping jaws to grab massive piles of loose brush.
2. Real-World Uses: Maximizing Your Machine on the Job Site
Knowing what the tool is called is one thing; knowing exactly when to deploy it separates the amateurs from the pros.
- Tight-Access Plumbing and Electrical: You get a call to run a new water line to a backyard detached garage. You track your 1-ton micro through a standard fence gate. You snap on a 12-inch trenching bucket, dig the precise line, lay the pipe, and then quickly swap to a 30-inch grading bucket to backfill the dirt smoothly. The task was completed within three hours.
- Landscaping and Hardscaping: You need to build a retaining wall. First, you use a ripper to tear out the old, stubborn stump in the corner. Next, you use a hydraulic thumb paired with a toothed bucket to pick up the heavy retaining wall blocks and precisely set them into place, saving your crew from manual lifting injuries.
- Interior Demolition: Because sub-2-ton machines have zero tail swing and tiny footprints, they are often driven straight through the front doors of commercial buildings for interior renovations. Attach a micro hydraulic breaker, and you can demolish interior concrete slabs safely and efficiently.
3. The Operator’s Guide: How to Attach and Detach Like a Pro
If you dread changing attachments because it involves beating rusty pins with a sledgehammer, you are losing valuable time. Here is the field-tested, frustration-free way to swap tools.
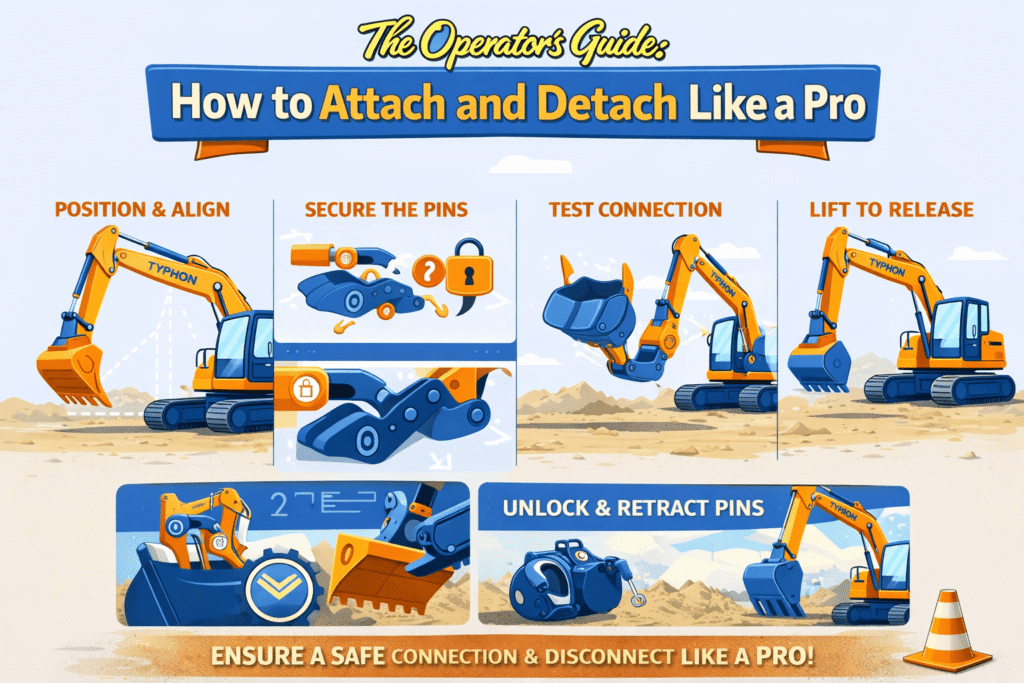
Method A: The Traditional Pin-On System
Many sub-2-ton machines use standard pin-on buckets to save weight and maximize breakout force.
- Level the Load: Curl the bucket so it is resting flat and entirely stable on level ground. Never try to pull a pin while the bucket is hanging in the air.
- Remove the Retaining Bolts: Take out the linchpins or bolts holding the main pins in place.
- Slide the Pins: If you’ve been greasing your machine daily (which you absolutely should be), the pins should slide out with a gentle tap.
- The Swap: Track the machine back, align the stick with the new attachment’s “ears,” and gently use the hydraulics to line up the holes. Slide the pins back in and secure them.
Method B: The Quick Coupler (The Productivity King)
If you invest in a Quick Hitch from a supplier like Typhon Machinery, your life changes.
- Curl and Release: Rest the attachment on the ground. Use the provided manual lever (or hydraulic switch in the cab) to disengage the locking wedge.
- Roll Out: Curl the stick outward to unhook the front pin, and back the machine away.
- Hook and Lock: Drive up to the new tool, hook the front pin with the coupler, curl the stick inward, and engage the locking wedge.
- The ground test: always press the newly attached tool firmly into the dirt before lifting it into the air to ensure the lock is fully engaged.
Dealing with Hydraulic Hoses (For Thumbs, Breakers, and Augers)
- The Golden Rule: Bleed the pressure! Turn the engine off, turn the ignition key back to the “ON” position (so the electronics work but the engine is dead), and wiggle your joysticks in all directions. This relieves the built-up pressure in the auxiliary lines, allowing you to push the quick-connect hoses together by hand easily.
[ecwid widgets=”productbrowser” default_category_id=”149986084″ default_product_id=”0″ minicart_layout=”MiniAttachToProductBrowser”]
4. Best Accessories for Increasing Efficiency and Productivity
If you want to squeeze every ounce of profit out of your micro excavator, look at these accessories.
- The Mechanical Quick Hitch: For sub-2-ton machines, a fully hydraulic quick hitch can sometimes be too heavy and expensive. A spring-loaded mechanical quick hitch is the perfect middle ground. It allows you to swap buckets in 60 seconds using a simple pry bar, without hammering out pins.
- Bolt-On Rubber Track Pads: If you frequently cross finished concrete or asphalt, standard steel tracks will leave brutal scars. Bolt-on rubber pads protect the client’s property and save you from laying down plywood all day.
- Heavy-Duty Tiger Teeth: If your standard bucket teeth are wearing flat, swap them out for twin-point “tiger teeth.” They penetrate dense ground much faster, which actually saves you money on diesel fuel because the machine isn’t struggling to dig.
5. The Compatibility Trap: Will It Actually Fit?
This is where people lose money. You find a fantastic deal on a used bucket online, drive two hours to get it, and realize it doesn’t fit your machine. When browsing specialized selections like the Typhon Machinery Sub-2-Ton Attachments page, you are guaranteed fitment for their models, but if you are cross-shopping, you must know your measurements.
The Holy Trinity of Pin-On Measurements:
- Pin Diameter: Grab a set of digital calipers. Sub-2-ton machines usually use 25 mm, 30 mm, or 35 mm pins. If the bucket accepts a 30 mm pin and your machine has a 25 mm stick, it will cause significant vibrations.
- Dipper Gap (Ear Spacing): Measure the inside width between the mounting brackets (ears) on the bucket. It must perfectly accommodate the width of your excavator’s stick.
- Pin Center-to-Center: Measure the exact distance from the center of the front pinhole to the center of the back pinhole. If this is off by even half an inch, your bucket cylinder won’t be able to curl properly.
Hydraulic Compatibility (GPM): For powered attachments like augers or breakers, check your machine’s Auxiliary GPM (Gallons Per Minute). A 1.5-ton machine might output 7 to 9 GPM. Make sure the attachment you buy operates efficiently within that exact range.
Frequently Asked Questions (FAQs)
Q: Can I put a thumb on a mini excavator that didn’t come with one? A: Absolutely. You can buy weld-on thumbs. A fabricator welds a base plate to your excavator’s stick, and you pin the thumb to that. For machines under 2 tons, mechanical thumbs (adjusted manually with a rigid stiff arm) are very common and highly cost-effective.
Q: Why does my hydraulic attachment operate so slowly? A: Two main reasons. First, check your hydraulic fluid levels; low oil means low pressure. Second, ensure the attachment’s required GPM doesn’t exceed what your specific micro-excavator can produce.
Q: Is a quick hitch worth the loss in breakout force? A: Adding a quick hitch extends the bucket slightly further away from the stick pin, which technically reduces your raw breakout force by a tiny percentage. However, the sheer amount of time you save swapping from a ripper to a bucket to a rake far outweighs a negligible drop in power. For 95% of operators, it is incredibly worth it.
Q: Are attachments for 1-ton and 2-ton machines interchangeable? A: Not always. A 2-ton machine often has thicker pins (e.g., 35mm) compared to a 1-ton machine (e.g., 25 mm). Always verify the pin diameter, ear spacing, and pin centers on pages like Typhon Machinery’s catalog before assuming universal fitment.
Q: How often should I replace bucket teeth? A: It depends entirely on the soil. Sandy, rocky soil acts like sandpaper and will wear teeth down in months. Loamy soil allows teeth to last for years. Inspect them weekly; once the teeth lose their point and become rounded nubs, you are wasting fuel trying to force them into the dirt. Replace them.
Equipping a subcompact machine with the appropriate tools completely transforms the situation. By respecting the weight limits, understanding your hydraulic flow, and utilizing smart accessories like quick hitches, you can outperform machines twice your size.