
The Ultimate Guide to Maintenance and Care for Mini Excavators
Whether you are a seasoned contractor managing a fleet of heavy machinery or an ambitious homeowner tackling a major landscaping project, your mini excavator is likely the backbone of your operation. These compact powerhouses are capable of performing tasks that would otherwise require the labor of a dozen people. But like any high-performing piece of equipment, it demands respect, attention, and a proactive approach to upkeep.
Proper Maintenance and Care for Mini Excavators isn’t just about keeping the machine looking nice; it is fundamentally about maximizing your return on investment, minimizing costly downtime, and ensuring the absolute safety of everyone on the job site. When you neglect your machine, you aren’t just risking a breakdown—you are throwing money away.
In this comprehensive guide, we are going to dive deep into everything you need to know about the Maintenance and Care for Mini Excavators. From establishing a rock-solid daily maintenance schedule to troubleshooting those sudden, frustrating hiccups on the job site, we will cover all the bases to keep your machine running smoothly for years to come.
1. The Essential Regular Maintenance Schedule
The cornerstone of proper Maintenance and Care for Mini Excavators is a strict, unyielding maintenance schedule. Think of this as the heartbeat of your machine’s health. Waiting until something breaks before fixing it can lead to disastrous consequences. Instead, you need a preventative approach broken down by operating hours.
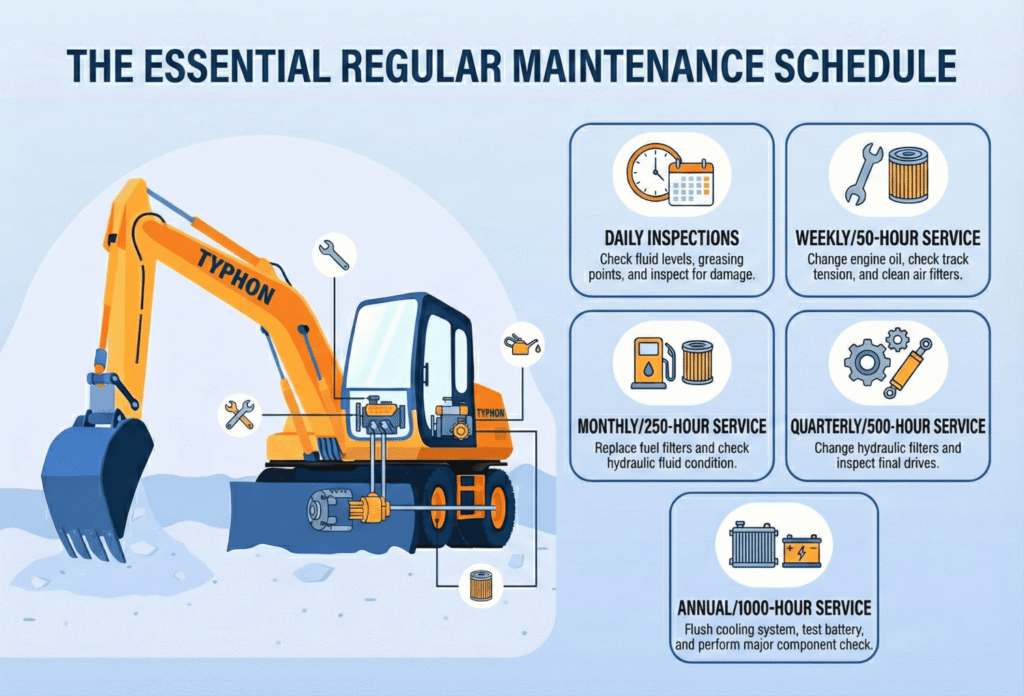
The Daily Walk-Around (Every 10 Hours)
Before you even turn the key in the ignition, you should perform a daily visual and physical inspection. This takes about ten minutes but can save you thousands of dollars.
- Check the Fluid Levels: Every single morning, check the engine oil, hydraulic fluid, and engine coolant levels. Running a machine dry is the fastest way to destroy an engine or hydraulic pump.
- Inspect the Tracks: Look closely at the rubber or steel tracks. Are there any massive cuts, missing chunks, or loose tension? Ensure there are no large rocks jammed in the sprockets.
- Grease the Pivot Points: Mini excavators have numerous grease zerks, particularly around the bucket, boom, and arm pins. Greasing these points daily flushes out abrasive dirt and prevents premature wear on the metal joints.
- Look for Leaks: Check the ground beneath where the excavator was parked overnight. Spotting a small hydraulic drip now is much better than blowing a hose under pressure later.
- Check the Water Separator: Drain any water from the fuel filter/water separator to protect your fuel injectors.
Weekly Maintenance (Every 50 Hours)
At the end of a hard week of digging, your machine needs a bit more attention.
- Check Track Tension: Tracks naturally stretch over time. If they are too loose, they can derail (a nightmare to fix in the mud). If they are too tight, they put massive strain on the undercarriage bearings and drive motors. Consult your manual for the specific sag measurement and adjust the grease cylinder accordingly.
- Inspect and Clean the Air Filter: A clogged air filter starves the engine of oxygen, leading to poor performance and higher fuel consumption. Tap the primary filter gently to remove loose dust. Never use high-pressure air to blow it out, as this can tear the paper element and allow dirt straight into your engine.
- Check Battery Terminals: Ensure the connections are tight and free of corrosive buildup.
Monthly / Periodic Maintenance (250 to 500 Hours)
This is where the heavy lifting of Maintenance and Care for Mini Excavators comes into play. Depending on your manufacturer, the 250-to-500-hour mark usually requires professional-level servicing.
- Oil and Filter Changes: Drain the old engine oil and replace the engine oil filter.
- Fuel Filters: Swap out the primary and secondary fuel filters. Modern diesel engines have incredibly tight tolerances, and even a microscopic piece of dirt can ruin an injector.
- Hydraulic System: While hydraulic fluid itself usually lasts up to 1,000 or 2,000 hours, the hydraulic filters should be changed much more frequently (often around 500 hours).
- Drive Motor Gear Oil: The final drives (the motors that turn your tracks) hold gear oil that needs to be drained and replaced periodically. Do not overlook this; a blown final drive is an incredibly expensive repair.
2. How to Properly Clean a Mini Excavator
It might seem counterintuitive to meticulously clean a machine whose sole purpose is to play in the dirt, but cleaning is a vital part of the Maintenance and Care for Mini Excavators. A machine caked in hardened mud runs hotter, hides dangerous leaks, and suffers from accelerated rust and undercarriage wear.
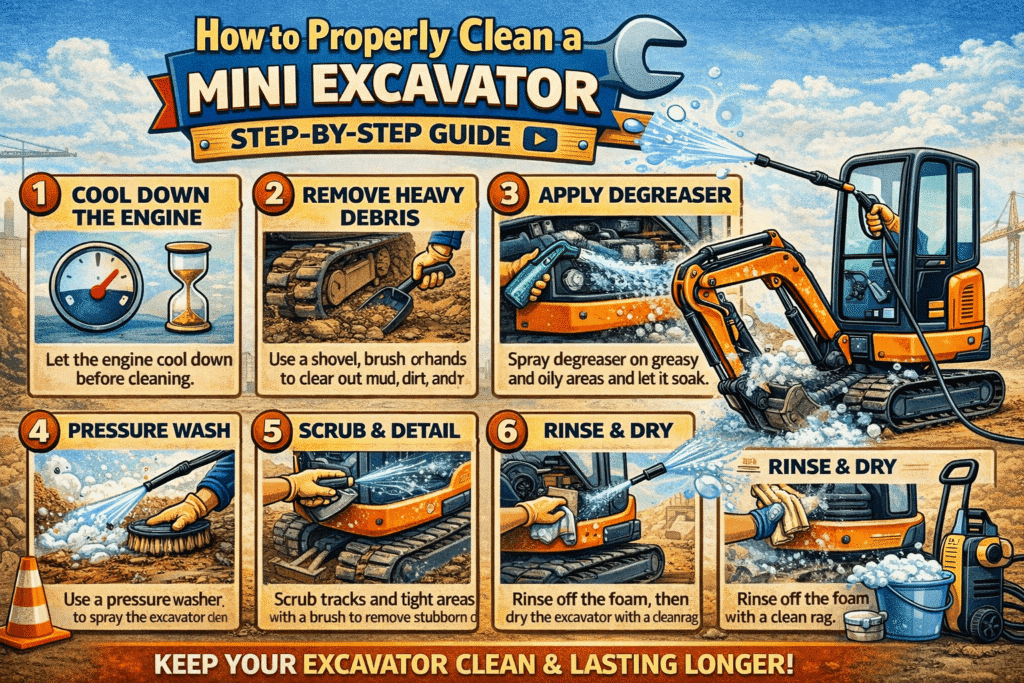
Step-by-Step Cleaning Process
- Knock Off the Heavy Stuff: At the end of the day, use a specialized undercarriage spade or a simple shovel to knock out the large clumps of mud, rocks, and debris from the tracks and the undercarriage. If you let clay dry overnight, it turns into concrete by morning, putting immense strain on your track motors.
- Pressure Wash with Precision: Use a pressure washer to clean the tracks, the boom, and the body. However, you must be incredibly careful. Never point a high-pressure wand directly at electrical connections, sensors, the radiator fins (you will bend them and cause the machine to overheat), or hydraulic cylinder seals. Keep the wand at least two feet away from these sensitive areas.
- Clean the Cabin: A clean cab is a safe cab. Sweep out the floorboards so debris doesn’t get jammed under the travel pedals. Wipe down the windows inside and out; visibility is your number one safety feature on a job site.
- Dry and Re-Grease: Once the machine is washed, let it dry. Pressure washing can strip away protective grease, so it is highly recommended to hit all your grease points again after a deep clean to push out any water that may have worked its way into the pins.
3. Common Mini Excavator Problems and How to Troubleshoot
Even with the best Maintenance and Care for Mini Excavators, things will occasionally go wrong. Knowing how to troubleshoot common issues can save you a panic-induced call to a mechanic.
Problem 1: Sudden Loss of Hydraulic Power
You pull the joystick to lift the boom, and the machine feels weak, sluggish, or refuses to move.
- Troubleshooting: First, check your hydraulic fluid level. If it’s low, you’ve found the culprit (but now you need to find the leak). If the fluid is full, check the hydraulic filters; a severely clogged filter will starve the pump. Finally, ensure the safety lock lever (the armrest lever) is fully engaged. Sometimes, debris prevents it from clicking perfectly into place, keeping the hydraulics locked out.
Problem 2: Engine Overheating
The temperature gauge is creeping into the red zone, and the machine feels overly hot.
- Troubleshooting: Immediately throttle down and let the machine idle to cool off; shutting it down abruptly when it’s boiling hot can warp engine components. Once cool, check the radiator. 90% of the time, an overheating mini excavator simply has a radiator plugged with dust, leaves, or mud. Carefully blow it out with low-pressure compressed air. Next, check the coolant level and the tension of the fan belt.
[woo_product_slider id=”28555″]
Problem 3: The Machine Won’t Start
You turn the key, and you get a weak crank or nothing but a clicking sound.
- Troubleshooting: Start with the basics. Is the battery dead? Check the terminal connections to ensure they aren’t loose or corroded. If the battery is fine, check the main battery disconnect switch (if your machine has one) to ensure it wasn’t bumped. If the engine cranks fast but won’t fire up, you likely have a fuel delivery issue—check for a clogged fuel filter or air in the fuel lines.
Problem 4: Track Derailment
One of your rubber tracks pops off the idler wheel.
- Troubleshooting: This almost always points to poor track tensioning or operating carelessly on extreme side-slopes. To fix it, you will need to safely lift the side of the machine using the boom, release the grease valve on the undercarriage to entirely loosen the tensioner, and use pry bars (and a lot of elbow grease) to muscle the track back onto the sprockets and idler. Once it’s on, pump grease back into the cylinder to achieve the correct tension.
4. Importance of Using Genuine Replacement Parts
When you are deep into the Maintenance and Care for Mini Excavators, it can be incredibly tempting to jump online and buy the cheapest aftermarket parts available. Whether it’s a replacement filter, a bucket tooth, or a hydraulic hose, cutting corners here is a false economy.
- Exact Tolerances: Genuine OEM (Original Equipment Manufacturer) parts are engineered specifically for the exact tolerances of your machine. An aftermarket oil filter might look identical on the outside, but the internal bypass valve might open at the wrong pressure, allowing unfiltered oil to destroy your engine.
- Material Quality: OEM tracks and undercarriage components are forged from high-grade steel and premium rubber compounds designed to withstand the machine’s specific weight distribution. Cheap aftermarket tracks are notorious for snapping prematurely or shedding their metal imbeds.
- Warranty Protection: Using non-genuine parts can often void the manufacturer’s warranty on your excavator. If an aftermarket hydraulic pump fails and sends metal shards through your entire system, the manufacturer will likely not cover the tens of thousands of dollars in resulting damage.
- Longevity: Genuine parts simply last longer. You might save $50 on a cheap part today, but it will cost you $500 in downtime when it fails on the job site next month. Stick to genuine parts to ensure your excavator operates as the engineers intended.
5. Safety Precautions When Operating a Mini Excavator
No discussion about the maintenance and care for mini excavators is complete without talking about the human element: safety. A well-maintained machine is safe, but it is only as safe as the person sitting in the operator’s seat. These machines are incredibly powerful, and a split-second lapse in judgment can lead to property damage or severe injury.
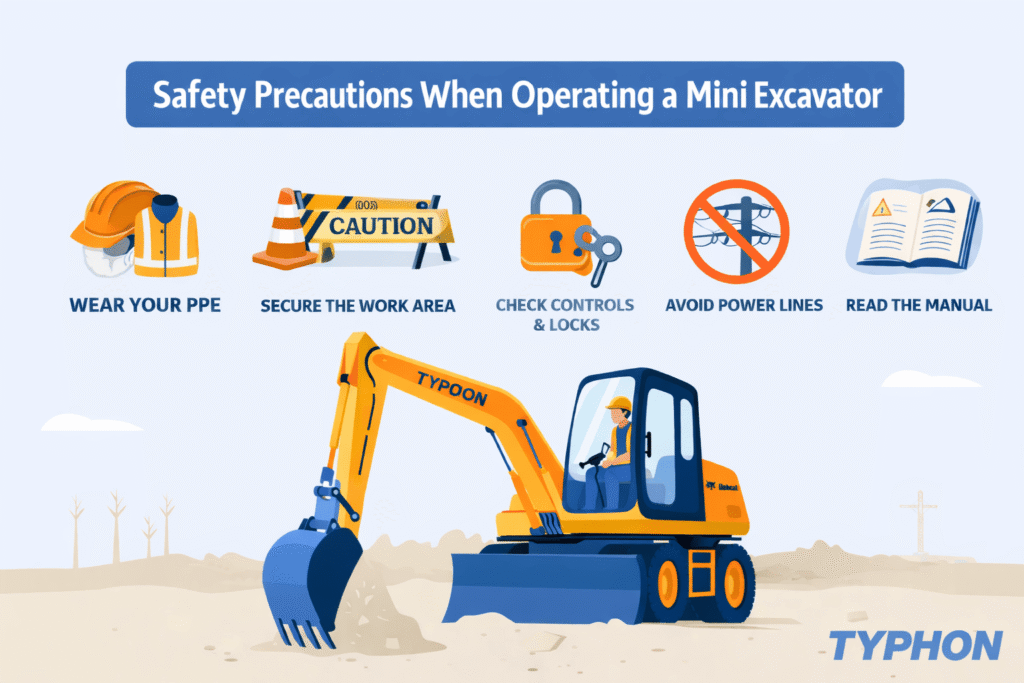
- Always Wear the Seatbelt: It sounds basic, but many operators skip this step. Mini excavators are narrow and can tip over surprisingly fast, especially when working on slopes or swinging a heavy load over the side of the tracks. The ROPS (Roll-Over Protective Structure) is designed to save your life, but it only works if the seatbelt keeps you inside the cab.
- Call Before You Dig: Never put a bucket into the ground without knowing what is underneath. Striking a buried electrical line, gas main, or water pipe can cause fatal explosions, electrocution, or massive flooding. Always contact your local utility location service (like 811 in the US) days before you begin a project.
- Maintain Three Points of Contact: When climbing in and out of the cab, always have three points of contact (two hands and one foot, or two feet and one hand). Slips and falls climbing off muddy tracks are one of the most common causes of job site injuries.
- Be Aware of the Swing Radius: “Tail swing” is a major hazard. Even if you have a “zero tail swing” model, the front boom and bucket still require massive clearance. Always know exactly where your coworkers, walls, and vehicles are before you rotate the cab.
- Travel Safely: When tracking across a job site, keep the bucket low to the ground (about a foot off the soil). This lowers the machine’s center of gravity and prevents tipping. If you are traveling up or down a steep hill, always keep the heavy end of the machine pointed uphill.
Conclusion
Mastering the maintenance and care for mini excavators is a continuous journey of diligence, observation, and respect for heavy machinery. By sticking rigidly to a daily and preventative maintenance schedule, keeping the undercarriage thoroughly clean, learning how to troubleshoot minor issues before they become major problems, investing in genuine replacement parts, and prioritizing job site safety above all else, you will guarantee that your mini excavator remains a reliable, money-making asset. Take care of your machine, and it will undoubtedly take care of you.
Frequently Asked Questions (FAQs)
Q1: How often should I grease my mini excavator? A: You should grease all the major pivot points (bucket, boom, and arm) every 10 operating hours, which typically equates to once a day. If you are working in extremely muddy, wet, or dusty conditions, you may even want to grease it twice a day to push out abrasive contaminants.
Q2: What is the lifespan of rubber tracks on a mini excavator? A: With proper Maintenance and Care for Mini Excavators, high-quality rubber tracks generally last between 1,000 and 1,500 hours. However, this varies wildly based on the terrain. Operating mostly on dirt and grass extends their life, while constantly spinning tracks on jagged concrete, gravel, or demolition debris can destroy them in a few hundred hours.
Q3: Can I use car engine oil in my mini excavator? A: No, you should strictly avoid using standard automotive oil. Heavy-duty diesel engines in excavators require specific heavy-duty diesel engine oils (like 15W-40, depending on your climate and manufacturer specs) that contain additives designed to handle higher soot levels and intense pressures. Always consult your owner’s manual.
Q4: Why does my mini excavator track to one side when I push both pedals equally? A: This usually indicates uneven track tension. If one track is significantly looser than the other, the machine will naturally pull toward the loose side. It could also be a sign of a failing final drive motor on one side, or an issue with the hydraulic travel spools not delivering equal pressure. Check and adjust track tension first.
Q5: Is it okay to leave my mini excavator outside in the winter? A: While they are built tough, prolonged exposure to freezing weather without preparation can cause damage. If you must leave it outside, make sure to use winter-blend diesel fuel to prevent gelling, ensure your coolant has the proper antifreeze ratio, and park the machine on planks of wood so the tracks do not freeze completely to the mud.